| Bringing Vintage Aircraft to Life since 2010 |
|
|
|
|
|
During the summer of 1940, as the air war raged in the skies above Britain, the pre-war fighter tactics developed by the RAF were tested against the Luftwaffe, who had honed their tactics during the Spanish Civil War, where they gained valuable combat experience. Early skirmishes between the two sides saw Fighter Command learn some valuable lessons, leading to tactical changes as the battle progressed.
Contents Pre-WarDuring the years preceding the Second World War (1939 - 1945), the prevalent idea that affected military thinking was, as Stanley Baldwin, leader of the Conservatives, stated in a speech in the House of Commons on the 10th November 1932 that “the bomber will always get through”, as it was envisioned that in a future war the enemy would deliver a knockout blow from the air. Limiting the damage enemy aircraft could do would be the responsibility of the Air Defence of Great Britain, which was established on the 1st January 1925, and was the component of the Royal Air Force tasked with defending the UK's airspace. As the RAF expanded during the 1930s, on the 13th July 1936 the Air Defence of Great Britain was disbanded and replaced on the 14th July 1936 by three new commands, Bomber, Coastal and Fighter alongside Training Command, formed on the 1st May 1936. Fighter Command, with Air Chief Marshal Sir Hugh Dowding as its Commander-in-Chief, was now responsible for the defence of the UK's airspace.  The tactics developed by Fighter Command, as part of its Air Fighting Manual, called for tight formations of three aircraft in a Vic formation to perform Fighter Area Attacks, of which there were six different scenarios to attack enemy aircraft, depending on the amount and type of aircraft intercepted. Once they spotted the hostile aircraft the squadron would position themselves according to the Fighter Area Attack chosen. However, this was based on the premise that attacking bombers would fly from airfields in Germany without effective fighter cover, which wouldn't be the case in the summer of 1940, as the Luftwaffe could operate from airfields in France. Fighter Command StructureWhen the battle began on the 10th July 1940, Fighter Command, whose headquarters were at Bentley Priory, was still commanded by Air Chief Marshal Sir Hugh Dowding and was structured as follows:
1. Replaced by Air Vice-Marshal Malcolm Henderson on the 20th July 1940. Aircraft Strength - 10th July 1940Fighter Command had 656 fighters available, consisting of 29 Hawker Hurricane, 19 Supermarine Spitfire, 6 Bristol Blenheim and 2 Boulton Paul Defiant squadrons. It could also call on Nos. 804 and 808 Naval Air Squadrons, the former equipped with Gloster Sea Gladiators and the latter Fairey Fulmars, who were on loan from the Fleet Air Arm.
The Luftwaffe could call on over 2,000 aircraft to begin their campaign to gain air supremacy over Southern England, one of the requirements for Operation Sealion the invasion of Britain to take place. Mainly comprising Messerschmitt Bf 109 and Bf 110 fighters, Heinkel He 111, Dornier Do 17 and Junkers Ju 88 twin-engined bombers and Junkers Ju 87 dive bombers. Squadron Structure, Vic and Finger-Four FormationDuring the battle, a typical Royal Air Force fighter squadron was to have twelve aircraft and pilots available for operations. The ideal number for the squadron was at least sixteen aircraft to cover those being serviced or out of action. To cover pilots who were on leave or unable to fly it was intended for the squadron to have at least 20 pilots to call upon, although at times some squadrons were unable to meet this number. The squadron would be split into four sections (red, yellow, blue and green) with three pilots (one, two and three), with two sections making up one flight of aircraft. Each section, flying in Vic formation, was led by a section leader with two wingmen, with red and yellow normally making up 'A' flight and blue and green normally making up 'B' flight, with a colour and number identifying each aircraft. For example, as shown in the squadron structure diagram below, the red section leader would be known as red one. 
When the battle began, the Luftwaffe were able to operate from airfields in France, enabling their fighters to escort the bombers to Britain. So when the RAF and Luftwaffe met in the skies above Britain and the English Channel, the ineffectiveness of the Fighter Area Attack tactics and Vic formation was soon exposed. As with the required tight formation, only the lead aircraft of every Vic was able to search for enemy aircraft, as the other two aircraft in the Vic had to focus on keeping formation, so an attacking aircraft could catch the formation by surprise, particularly from the rear. Although the tactic was later modified so that the fourth section would fly 1,000ft above and behind the other three sections, whilst weaving, to help minimise the chances of an attack from the rear, casualty rates among these aircraft were high. 
 Despite complaints about the Vic formation, no official change was forthcoming, so some squadrons adapted a tactic being used by the Luftwaffe called Schwarm, which was a more flexible tactic. This had been developed after the combat experience of the Luftwaffe's Condor Legion in the Spanish Civil War (1936 – 1939) and would be called Finger-four by the RAF. This involved four aircraft flying in formation, but operating in pairs. This allowed the attacking aircraft to be covered by his wingman with the overall formation spaced at about 200 meters apart and flying at various altitudes. This meant the pilots could focus on looking for enemy aircraft and also protect each other, and if the formation was attacked the two pairs would split up, one going left the other to the right. The Finger-four tactic also meant that the squadron formation changed as it would now be divided into three sections of four as opposed to the Vic formation's four sections of three. In the aftermath of the battle, Fighter Command modified its tactics in 1941, before, in 1942 the Finger-four formation was officially added to pilot training. 
Engaging the LuftwaffeWhen an incoming raid had been plotted by Britain's Air Defence System, also known as the 'Dowding System' (see diagram below), squadrons would be scrambled by controllers as and when needed, as opposed to a large formation, allowing an enemy raid to be under constant harassment by the Royal Air Force which also had the effect of breaking up the Luftwaffe formations, however, fighter sweeps by the Luftwaffe were not a priority for Fighter Command. 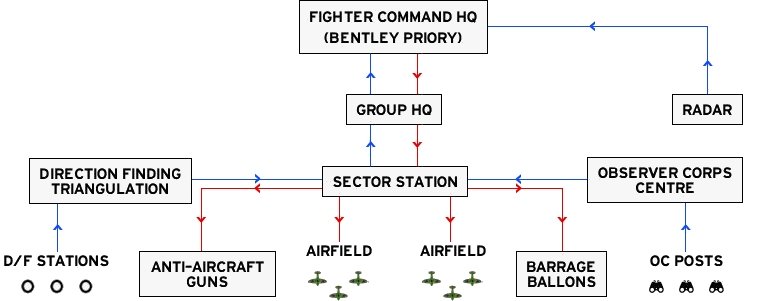
The opening stages of the battle, during July and early August 1940, saw the Luftwaffe probe the Royal Air Force's defences by attacking shipping in the English Channel and targets along the coast. However, mid-August saw the Luftwaffe change tactics and launch Operation Eagle Attack on the 13th August 1940, known as Eagle Day, this saw the Luftwaffe try to lure the RAF into battle in the air by targeting Fighter Command's infrastructure. Many tactical instructions were issued during the battle, and this new phase saw the first major tactical changes by Fighter Command when, on the 19th August 1940, Air Vice-Marshal Keith Park, Air Officer Commanding, No. 11 Group, Fighter Command, issued a number of instructions. Among these was for RAF fighters to operate only over land or gliding distance to the coast.
And prioritising German bombers as targets.
Seven days later on the 26th August 1940, Air Vice-Marshal Keith Park issued further instructions to help with the interception of German formations, as not all squadrons sent to intercept were doing so. This would require details on the intercepted raid to be detailed over the radio to help controllers vector more squadrons to the correct area.
One of the final major instructions issued by Air Vice-Marshal Keith Park was on the 11th September 1940 that when contact was made with the Luftwaffe formation, the Spitfires should tackle the fighter screen, whilst the Hurricanes concentrated on the bombers and close escort. However, as radar couldn't differentiate between the aircraft in a raid it wasn't always possible for this to happen.
By the time this instruction was issued, the Luftwaffe had again changed tactics and were targeting London and other cities across the UK, in what was to become known as the Blitz. Starting in the second week of September 1940, Spitfires and Hurricanes would patrol at height waiting for incoming raids. They would then report details of the raid to ground controllers. This would lead to the formation of 421 Flight on the 21st September 1940. The Big WingAs the battle progressed the idea of large formations of multiple fighter squadrons intercepting enemy raids was championed by Air Officer Commanding, No. 12 Group, Fighter Command, Air Vice-Marshal Trafford Leigh-Mallory and Acting Squadron Leader of No. 242 Squadron, Douglas Bader. The idea of the Big Wing was to get three to five squadrons (36 – 60 aircraft) to form together and engage enemy aircraft in numbers. The issue with these larger formations was if vectored to the wrong position, missing the enemy formation, there may not be any reserve squadrons available to intercept the raid instead. Known as the Duxford Wing, it was used for the first time on the 7th September 1940 and was led by Acting Squadron Leader Bader. Comprised of Nos. 242 and 310 (Czechoslovak) Squadrons, flying Hurricanes from RAF Duxford, and No. 19 Squadron, operating from Duxford's satellite airfield RAF Fowlmere, flying Spitfires, they formed together to protect RAF North Weald whilst its squadrons were in combat. They arrived to late to stop the airfield from being attacked but did engage the Luftwaffe and for the loss of one aircraft, claimed eleven German aircraft. This would be a familiar story, as it normally wasn't until after the target had been attacked that the Big Wing would make contact with the attacking aircraft. One of the successes of the Big Wing was its psychological effect on Luftwaffe aircrews, who were told the Royal Air Force was close to being defeated, to then come up against a formation of up to 60 fighter aircraft. 
< Back to articles |
|
|
|
||||||||||||||
|